Showing posts with label Fiesta Friday. Show all posts

Monday, July 24, 2017

Devasthana Saaru/ Vattunu saaru ( Temple Rasam with freshly ground spices)


We Mangalorean Konkanis swear by our temple rasam or Devasthana Saaru as we call it. "Devasthan" means "temple" in English and "Saaru" is the Konkani word for rasam. What is rasam?? Rasam is a spicy, tangy soup that is made with tomatoes and spices. It is usually served as an accompaniment to rice the same way dal is served with rice. People love to drink it too. It is also purported to be the perfect remedy for cough and cold. It not only clears your sinuses but also rekindles your appetite. 


So why is Devasthana Saaru so special?? It is because it is almost impossible to recreate the taste of it at home. This rasam is usually served with food at events in the temple. Why is food served at the temple? Well, like anywhere else in the world, food is the greatest motivator. Therefore during big religious events/activities in the temple, lunch/dinner is served afterwards. It also feeds many hungry people. Coming back to the rasam, this particular rasam is always made by freshly roasting and grinding the spices and then making it. A powdered version is never used. That is why this rasam is also called "Vattunu Saaru "which translates to "Ground rasam" or "Arachi rasam" as South Indians call it. The aroma and flavor of this rasam both as it is made and when it is consumed is unlike any other! You have to make it to believe it!😊 


For the longest I used to think that the task of making it was very tedious. But in reality it is not. It is actually quite easy and uses ingredients normally present in your kitchen. Do try it.. You will never buy rasam powder again! This recipe has been kindly shared by my very talented cousin Karuna who is also an excellent cook!


Servings: 6-8

Prep time: 15 mins Cook time: 20-25 mins Total time: 25-30 mins 


Ingredients: 


Coriander seeds: 2 tsp
Cumin seeds/jeera: 1/2 tsp
Chana dal ( split chick peas): 1 tbsp 
Urad dal ( split matpe beans): 1 tbsp
Pepper corns: 5-6
Methi/ fenugreek seeds: 4-5
Turmeric powder: 1/2 tsp
Curry leaves: 1 sprig
Hing/Asofoetida powder: 1/8 tsp
Salt: 1 tsp ( adjust as per taste)
Dried Red chillies: 5-6 
Tamarind pulp: 1 tsp 
Green chillies: 4-5
Tomatoes: 2 medium sized, chopped
Coriander leaves, chopped: 2 tbsp
Water: 1 Liter

For seasoning:
Coconut oil: 1 tbsp
Mustard seeds: 1 tsp
Curry leaves: 1 sprig 
Hing: a pinch ( either powder or paste)

Method: 


Take 1 liter water in a pot. Add the chopped tomatoes, green chillies and salt. Bring it to a boil. Continue boiling for 10 mins. 

While the above mixture is boiling, 
dry roast the coriander seeds, cumin,  urad dal, Chana dal, pepper corns, methi, haldi, curry leaves, hing, red chillies. Once cooled add it to the blender. Add tamarind, little water and grind to a paste. 

Add this to the pot with boiling water and tomatoes. Continue boiling for 5-10 mins. Turn off the flame. Garnish with curry leaves. 

Tempering: 
Heat coconut oil in a small pan. Add mustard seeds. Once the mustard seeds splutter, add the curry leaves and a pinch of Asofoetida. Turn off the flame. Add this to the above pot. 


Serve hot with rice or drink it like a soup!! 


Enjoy!

I am bringing this delicious soup to Fiesta Friday #182 so that all our friends can enjoy something very Indian! Angie's cohosts this week are Liz @ spades, spatulas & spoons and Jenny @ Jenny Is Baking.


Cooking made easy:


Cleaning as you cook reduces the stress of cleaning after a meal. It also ensures that the kitchen is not messy. 


Tip for healthy living:


Try to incorporate atleast one vegetarian meal per week or per day whichever is feasible for you. It helps keep the system clean!

Food for thought:


Fortune is like glass-the brighter the glitter, the more easily broken. Pubilius Syrus 


Please do share your thoughts. Your opinion matters!


Let us stay connected on Facebook Pinterest | Twitter | Instagram | Google+

Monday, January 30, 2017

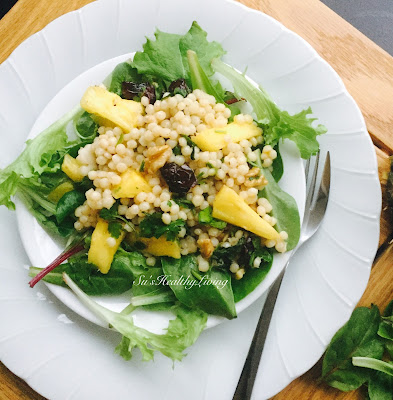
Pineapple Couscous Baby Greens Salad.


When I saw Angie's Healthy Recipe Challenge I was intrigued. When I saw that the primary ingredients that she wanted in the dish were pineapple and greens, I was challenged. I wanted to think out of the box and create something that had these ingredients. I was in the process of making Couscous salad with cranberries and walnuts  for dinner . I decided to encompass these two ingredients and come up with a more nutritious salad. The resulting salad was exotic and delicious! My husband loved it! Him saying something is good is a big compliment in itself.


So try this salad when you get a chance. You will be hooked. My neighbor loved it too.. I got the couscous that cooks in just 10 mins. This is perfect for a weeknight dinner! The leftover makes for a perfect lunch.


Here is the recipe:

Servings: 3

Prep time: 5 minsCook time: 10 minsTotal time: 15 mins


Ingredients:


Couscous: 1 cup
Water: 1 & 1/4 cup
Salt: a pinch
Olive oil: 1 tsp
Dried cranberries : 1/3 cup
Roasted Walnut pieces : 1/4 cup
Pineapple pieces: 1 cup, diced small
Parsley: 1/3 cup, finely chopped
Freshly ground black pepper:1/4 tsp
Extra Virgin olive oil: 1/3 cup
Lemon juice: 1/4 cup, freshly squeezed
Sea salt: 1/2 tsp
Sriracha or hot sauce: 1/2 tsp ( optional)
Minced garlic: 1/4 tsp
Baby greens: 4 & 1/2 cups

Method:


Take 1 & 1/4 cups water in a saucepan and bring it to a boil. Add salt, olive oil and couscous. Cover and cook on low for 10 mins. When done, turn of the flame and fluff it. Keep aside to cool.

Add into a small jar, lemon juice, olive oil, salt, black pepper, minced garlic, Sriracha/ hot sauce. Close the jar and mix thoroughly. Keep aside.


Take the cooled couscous in a salad bowl. To this add the pineapple pieces, chopped parsley, dried cranberries, roasted walnuts & the prepared dressing. Mix thoroughly. Keep it refrigerated until ready to serve.


For serving:
Divide the baby greens equally among 3 plates. Then divide the couscous salad on it. Sprinkle some walnuts &/or parsley on top.


Serve immediately.

Enjoy!

Cooking made easy:


If you intend to make/ pack this for lunch, then pack the greens separately in a container. Make sure you wrap the greens in papertowel.


Use another container for the salad. I you want the walnuts crunchy, pack it separately in a small container/ ziplock.

Tip for healthy living:


A salad like above can be quite nourishing and filling. It has pretty much all the food groups in it making for a complete balanced meal that is satisfying, yet low in calories.

Food for thought:


A little patience goes a long way. Unknown


Please do share your thoughts. Your opinion matters!


Let us stay connected on Facebook Pinterest | Twitter | Instagram | Google+

Sunday, January 29, 2017

Pineapple Chicken Kebabs with Sumac


When Angie announced the Healthy Recipe Challenge, I was intrigued. When I looked at the ingredients that she wanted to be used in the recipe, I scratched my head. Greens and pineapple in one recipe!! I couldn't resist the challenge! I was making some Sumac chicken kebabs with vegetables for lunch. I figured I will throw in the pineapple with it & serve the kebabs on a bed of baby greens. Who could resist a platter like that??


During my recent visit to the grocery store, I came across Sumac. This is a spice that I have known through Elaine and other friends here at Fiesta Friday. I have been waiting to try it for a long time now. While we all love grilled vegetables, I was positive that grilled pineapple would taste delicious. And it turned out to be delicious!  Together with sumac, it was an irresistable combination! We ate the kebabs served on a bed of baby greens for lunch and ate the leftovers served with Pineapple Couscous Baby Greens Salad for dinner!! 


This is a very easy recipe that would be perfect for weeknight dinners , as appetizers or sides for parties! Super Bowl is next weekend guys!! You can prep, marinate and keep everything ready in the refrigerator ahead of time, and throw it on the grill or in the oven a few minutes before your guests arrive! Voila! Delicious kebabs ready in minutes!!


Servings: 2


Prep time: 45 mins ( including marination) 

Cook time: 15 mins

Total time: 1 hour


Ingredients:

Boneless, skinless chicken breast: 1 lb, cut into bite-sized pieces
Salt: to taste
Black pepper: 1/4 tsp+ 1/4 tsp
Lemon juice: 2 tbsp
Sumac: 1 tsp + 1 tsp
Italian herbs ( dry): 1/2 tsp + 1/2 tsp
Bell peppers: 2 ( different colors), diced big.
Cherry tomatoes: 10 ( may not need all)
Red onion: 1, diced big and petals separated.
Pineapple pieces: 1 cup
Olive oil: 1 tbsp
Baby greens: 1 & 1/2  cups

Method:


Clean and marinate the chicken with salt, pepper, lemon juice, Italian herbs & sumac, for at least 30 mins.

In a bowl, take the bell peppers, diced onion, cherry tomatoes and pineapple pieces . Add olive oil, a pinch of salt, 1/4 tsp pepper, a little sumac and Italian herbs.


Set the oven on broil and preheat it.

Take a skewer and arrange the veggies and chicken pieces as you wish and the amount that you want.


Arrange it on a baking/grilling tray. Place the tray in the broiler and cook the chicken and vegetables for 14-16 minutes or until the chicken is cooked  thoroughly and to desired tenderness.


Divide the baby greens equally on two serving plates. Arrange the skewers on the bed of baby greens. Just before serving, sprinkle a little more sumac on the skewers.

Can be served with cilantro/ mint chutney.

Serve hot!

Enjoy! 


Apart from linking to the Fiesta Friday Healthy Recipe challenge, I am bringing this to Fiesta Friday #156 and Saucy Saturdays.

Cooling made easy:


The kebabs can be grilled on a outdoor grill, on a stove-top grill or even baked at 400 deg F or 200 deg Celsius on the middle rack of the oven. If you don't have steel skewers, you can use bamboo skewers, but make sure that you soak the skewers in water for sometime before using.

Tip for healthy living:


Grilling or broiling is a much healthier option for frying chicken or vegetables. It is low in calories and pretty much fat free!

Food for thought:


Think before you leap! Unknown


Please do share your thoughts. Your opinion matters!


Let us stay connected on Facebook Pinterest | Twitter | Instagram | Google+

Friday, August 5, 2016

Marvai / Clams Sukka ( Clams cooked with Indian spices in a coconut-based sauce)


Marvai Sukka or Clam Sukka is a signature dish of the costal region of Karnataka state in India. You will not find it anywhere else in the country and you will never see it on the menu of an Indian restaurant abroad!! But people from the costal areas of South Canara would do anything for this dish! Those who have seafood allergies, opt for the chicken version which you can find here. There is also a vegetarian version where black chick peas and ivy gourd is used.


So what exactly is this dish? It is basically clams cooked with Indian spices and freshly grated coconut. It is mouthwateringly delicious!! And truthfully, it is not all that hard to cook. Well, my version isn't!;) You all know that I don't like anything that is tedious or has lengthy procedures!! Do try this if you get a chance..


Guess what guys?? Today I am co-hosting Angie's Fiesta Friday #131,with a brand new co-host from down under, the very talented Laura from Feast Wisely. Sounds like a gal who thinks like me! I am sure we will get along like a house on fire!!;) No, No , I promise to mingle and share the love with all of you! For those of you, who don't yet know what Fiesta Friday is yet, it is time to check it out! It is one of the friendliest blogger parties ever! I joined Fiesta when I first started blogging two and something years ago. Over the past two years, I have made several friends at the Fiesta, learnt a lot from all the wonderful bloggers who party there. The best part about Angie's Fiesta is that everyone is so willing to impart whatever they know to you. This place is a blessing to new bloggers.Check out the guidelines here for coming to this party. Link up your posts at Angie's Fiesta and to both the co-hosts!


Now, let us check out Marvai/Clams Sukka recipe!


Prep time: 25 minsCook time: 20 minsTotal time: 45 mins


Servings: 4-6


Ingredients:


Clams : any size will do  1 lb/ 1/2kg.I used a dozen little neck clams.
Lemon juice: from 1 small lemon
Coconut oil: 2 tbsp
Ginger garlic paste:  1 tbsp
Onion : 1 medium
Tomato : 1 medium
Curry leaves : 1/4 cup
Chilli powder : 1 tsp ( can be adjusted as per individual spice level)
Coriander seeds : 1 tbsp
Cumin seeds (jeera): 1 tbsp
Black pepper powder : 1/2 tsp
Turmeric powder (haldi): 1 tsp
Garam masala powder:  1/2 tsp
Freshly grated coconut : 1 cup
Salt: as per taste.


Method:


Soak the clams in fresh water to clean the sand off. Clean the clams thoroughly.


Add it to a pot with 1/2 cup water. Cover and bring it to a boil. Let it boil for 2-3 mins or until the shells open. Turn the stove off. Let it cool down.

Once cooled down, separate the clam meat from the shell and keep aside. Reserve some of the liquid in which it was cooked.

In the meantime, prepare the masala/sauce.

Heat 1 tsp coconut oil in a sauté pan or kadai.  Sauté curry leaves lightly and keep aside.

Add 1/2 cup freshly grated coconut with coriander seeds and cumin seeds to the same pan. Sauté  until it turns light brown. Let it cool down completely.

Once it cools down, grind it with  pepper powder,chili powder and garam masala powder. Keep it aside.

Add  1 tbsp coconut oil to the pan . Add chopped onions and tomato to the same pan. Sauté until lightly brown and oil separates. 


Add ginger-garlic paste and sauté for 3-4 minutes .

Add the ground paste and mix well. Add the clam meat, the reserved liquid  and bring it to a boil. Cover and cook until the clams are tender.

Add the remaining fresh coconut and cook for 2-3 minutes.

Garnish with the roasted curry leaves.


Serve hot with rice/roti or bread!

Cooking made easy:


This dish is made even more flavorful by adding couple more clam shells in the sauce while cooking it.

Tip for healthy living:


Obesity is caused by an imbalance between the calories consumed ( food eaten) and the calories spent ( amount of physical activity). Staying fit or healthy  is balancing the amount of food eaten and the amount of daily physical activity undertaken.

Food for thought:


Everything that is done in the world is done with hope. Martin Luther


Please do share your thoughts. Your opinion matters!

Friday, July 22, 2016

Roasted Eggplant Fan; Guest post by Jhuls

Guys, I am back with a guest post for you this week!! Yay!! I am so happy to have this amazing blogger as my guest this week. In this ruthless world of blogging, there are those handful few who are "nice"  & "kind" to others! Those who actually think of others and want to do good for others. One such person is Jhuls from "The Not So Creative Cook". I am proud to say that Jhuls is my friend. In my journey of blogging for the past 3 years, she is one of those who supported my stumbling steps from the begining and nurtured my growth with her constant encouragement. In fact, her blog has a section where every week she introduces new bloggers to the rest of the world.

When I reached out to Jhuls a few weeks ago, she was taking a break from blogging and she promised me a guest post as soon as she was back in circulation. It is interesting that she reached out to me earlier this week when I was feeling low as I had just lost my very healthy aunt in a "hit and run" accident. I am still trying to come to terms with that loss. It is as if she "sensed" my need and reached out.. that is real friendship. 

Jhuls is an excellent chef as is evident from her blog " the not so creative cook". Do not go by the title. She is extremely talented,creative, not to mention bubbly and naughty! Check out her blog for all the very creative recipes. Her blog will leave you mesmerized. Today she brings us a delicious and easy recipe of " Roasted Eggplant Fan". I hope you enjoy this post as much as I have. Thank you Jhuls for this amazing guest post. I am bringing this to Throwback Thursday #48Fiesta Friday #129 and Saucy Saturday #54!


With the fact that I am not that active in blogging for the last month, I am surprised that a fellow blogger invited me to do a guest post… And even more surprised that I am again invited to do it for a blogging friend who is more on the “nice side”.  :D

I feel so honored to be doing a guest post today for Su @ Su’s Healthy Living. Aside from she is so kind to share her healthy recipes with us, Su is such a good, wonderful blogging friend who is always there to lend a helping hand. She was one of the bloggers who volunteered to do a guest post for me. She was one of the firsts, to be precise. 

I received an invitation from Su during the time when I was taking a break from blogging. Even I was not blogging for a month, I didn’t stop thinking of what to make to share them with all of you.

Since I am on the “nice side” today and I am doing a guest post for our dear friend, Su, I am sharing something easy, but very delicious (at least for me who loves eggplants a lot). Su required something easy, quick and healthy. I am still struggling with quick recipes, so I will bring you the easy and healthy one.


I really love everything eggplant and when I saw the recipe from All That's Jas (http://all-thats-jas.com/2015/06/roasted-eggplant-fan.html), I just had to make it. I made few adjustments and I loved it, I really did. 

Though this Roasted Eggplant Fan takes more than an hour to be ready, it is very easy to prepare and it’s really worth the wait. The eggplant fan alone tastes really good, but I am very much head over heels with eggplant + lemon-tahini sauce. Whoa! That's a good food marriage. Let's top with more crumbled feta cheese and their relationship with never be boring. 


With the addition of lemon-tahini sauce, I was in heaven! 


Servings: 2

Ingredients:

1 medium American eggplant
2 large tomatoes, sliced into thin rings
2 garlic cloves, grated
4 oz feta cheese, crumbled (plus more for topping)
Fresh basil, roughly chopped
Olive oil
Salt and pepper, to taste
Dried or fresh parsley, for garnish
Lemon-tahini sauce, to serve

Instructions:


Preheat the oven to 350F. Prepare a baking sheet with parchment paper. Set aside.

 Rinse the eggplant and dry with a paper towel. Cut the eggplant into thin slices, making sure to leave the stem attached.

Grease each slices with olive oil and season with salt and pepper. Place the eggplant on the parchment-lined baking sheet.   

Fill each eggplant slices with tomatoes, garlic, feta and basil. Carefully press the eggplant, shaping it into a fan.

Drizzle with more olive oil. 

Roast/bake the eggplant for 1 hour and 15 minutes or until liquid has evaporated. 

Transfer to a serving plate. Drizzle with lemon-tahini sauce and top with more crumbled feta cheese.

For the lemon-tahini sauce: 

1/4 cup tahini
3-4 tbsp freshly squeezed lemon juice
Salt, to taste
Warm water

In a bowl, place tahini sauce. Start off by adding 3 tbsp lemon juice. Add water until desired consistency. Add salt. Do a taste test and adjust according to your preference. I love mine lemony, a little salty and not too thick and runny.

I hope you all liked my version of Roasted Eggplant Fan. Try it and you will never be disappointed. 

Su, I had fun doing this for you and for our friends. Thank you so much for the opportunity. I would love to come back. ;)  

******

Yay! That's all, Su. I hope you liked it! 

x Jhuls