Saturday, June 4, 2016

Poori-Saagu ( Fried Indian bread served with spicy mixed vegetable stew).


Poori-Saagu is a common item found on the menu in restaurants in the region of Bangalore/Mysore in India. Whenever I visit Bangalore, I love to eat in the small hole-in-the-wall types restaurants that are all over the city. For some reason the food is absolutely delicious!  Poori is nothing but puffed Indian bread that is usually fried. This is served with a mixed vegetable spicy stew that is made with coconut-based sauce.


So how is this healthy and what is a fried item doing on my blog? I can answer that honestly. My blog promotes healthy eating and living realistically. While best practice would be for us to eat healthy 100% of the time, this is not realistic. Everyone craves certain types of food from time to time. It is ok to indulge those cravings in MODERATION once in a while. My one such craving is poori.


Poori can be made a tad bit healthier by virtue of the choice of flours used. This can be done by using oat-flour instead  of wheat flour.  It fluffs up just as well as that which is made with wheat flour  and tastes just as great! Do give it a try to check for yourself! You can make it gluten-free by using only oat flour, but that may get tricky when you fry them as once they expand, they tend to collapse. 


These are also perfect for the lunchbox for the kids, especially when you serve it with a mixed vegetable side-dish such as Saagu


For recipe for Saagu, Click here:


Recipe for Oats Poori:

Servings: 2-4


Ingredients: 6-8 small- medium sized pooris


Oat flour: 3/4 cup
Whole wheat flour: 1/4 cup
Cooking oil: 1  tsp
Salt: 1/4 tsp
Sugar: 1/2 tsp
Lukewarm water: 1/2 cup ( you may not require all of it).

Method:


In a bowl mix together the flour, 1/2 tsp oil, salt and sugar. 

Make a well in the center. 

Add water little bit at a time and make a nice, soft dough. 

Knead well and make a ball. 

Apply oil to the outside of the ball. 

Cover with a damp cloth/ paper towel and keep aside for 15-20 minutes.

Pinch little portion of the dough to make small lemon sized balls. Now roll out the balls to make small pooris.

Heat oil in a wok/ kadai on medium flame. 

When the oil is hot enough, drop the poori in it and with the back of a slotted spoon gently press it down into the oil. This will help the poori puff up. 

When the poori puffs up and floats to the surface of the oil, flip it and let it cook for few seconds on the other side. 

Now remove it from the oil and drain it on paper towels.

Serve hot with Saagu as I have done or any side dish of your choice!


Enjoy!


I am bringing this delicious breakfast to all my friends at Throwback Thursday#41, Fiesta Friday#122  and Saucy Saturdays#47! Angie's co-hosts this week are Mollie @ The Frugal Hausfrau and Aruna @ Aharam


Cooking made easy:


If you are not gluten-intolerant and you don't particularly care for the texture of oats flour, the best texture can be achieved by doing a 50:50 mix of oat flour and whole wheat flour.

Tip for healthy living:


This information is especially for people who are gluten-intolerant & those who choose to avoid gluten. While oats are naturally gluten free, it is best to get oats that are labelled " gluten-free", as quite often oats is contaminated with wheat as they are often processed in the same facility.


Food for thought:


Everything that is done in the world is done with hope. Martin Luther


Please do share your thoughts. Your opinion matters!

Thursday, June 2, 2016

Guest Post Series: Irish Soda Bread by Anshu Wadhwa Pande


 I know you all.. I have not posted anything in a while!! I mean my own posts!! The reason is that the sun is shining and I am more out of the house than in the house! Last weekend was a long weekend and we went on a road trip to Cape Cod. We loved the beaches and the islands of Nantucket and Martha's Vineyard. I wanted to check what all the hype was about and I must confess that I like it. Yes, I like it. It is very idyllic.. I would love to have a little summer shack on the beach.. take walks whenever I want, lay down on the beach and read a book.. well, you get the idea..
Apart from the vacation, back in the city, my kids want to be out all the time!! And there are so many activities that are going on!! I am literally tired!!

Well, guys, that is very reason I had planned for the guest posts. You guys who diligently follow me shouldn't be deprived. With the guest posts, you will have more variety and more people ( bloggers) to follow!


I hope you guys enjoyed Shaheen Ali's Besan Ke Phulki last week. This week, I have a budding food blogger as my guest, Anshu Wadhwa Pande.She is a qualified lawyer whose deep interest in food defines her! She considers cooking as a sacred activity. She states that she learnt cooking out of need which eventually grew on her and became her passion. She blogs from The Secret Ingredient where she experiments with food, styles them and photographs them. She lives in Mexico.

 Today, she is bringing to us an easy "no-knead" bread that is without yeast!! The Irish Soda Bread! I have to try this for my mom and my kids to personally check how it comes together. Do check her blog for more interesting recipes.


Ingredients:

4 cups of All Purpose Flour
¼ cup of Granulated sugar
1-1/4 cups of Buttermilk
1 cup of Raisins
2 Eggs
1 tsp of Baking Soda
2 tsp of Baking Powder
¾ tsp of Salt
1/4 cup of Unsalted Butter, cold and cut into small cubes
Zest of ½ of an Orange


Method:


1. In a mixing bowl add All Purpose Flour, Sugar, Baking Powder, Baking Soda and Salt. Combine them.
2. Add Cold cubes of butter and mix them with the dry ingredients using your finger tips until it starts to resemble like a sand. You can even use a fork to mix the butter.
3. In a jar add Buttermilk, eggs and Orange Zest and whisk them together, Add the wet ingredients to the dry ingredients and continue to mix until everything comes together like a dough. Do not over mix.
4. Add the raisins and combine.
5. Flour the counter and place the dough. Knead and shape it into a round loaf.
6. Preheat the oven to 190 Degree Celsius and line a baking tray with Parchment Paper.
7. Place the Round loaf on the Baking Tray and score Plus sign (+) with a sharp knife.
8. Bake it in the oven for 45 minutes to an hour or until the bread feels hallow when tapped. 
9. Bring it to room temperature before slicing.
Enjoy!!


I am bringing this delicious bread of Anshu's to all my friends at Throwback Thursday#41, Fiesta Friday#122  and Saucy Saturdays#47! Angie's co-hosts this week are Mollie @ The Frugal Hausfrau and Aruna @ Aharam


Please do share your thoughts. Your opinion matters!

Friday, May 27, 2016

Guest Post Series: Besan ki Phulki (a GF snack), by Shaheen Ali


I hope you all liked Shobana Rao's Lobia Suva Bhaji Subzi last week!
My guest today is a young, dynamic & bubbly person who is a die-hard foodie, Shaheen Ali! She hails from a gastronomic family and started her blog Spoonfork&food in 2014 to document and share her experiences with food. Her amazing photography skill makes her blog a visual treat! Her blog recently celebrated it's second anniversary and even better, it just moved to it's new abode! Now that is what I call growth! Shaheen is a young mother with one son. She lives in India with her family.

Like me, she is a physical therapist by profession and understands the importance of eating healthy! Today, she is sharing with us a popular snack from Uttar Pradesh ( a Northern Indian state), Besan ki Phulki. This is a gluten-free snack made with chick-pea flour and served with a spiced, tangy yogurt-based sauce. Shaheen has made this traditionally fried snack healthier by cooking it in the appe pan. Do check this recipe out and also head to Spoonfork&food to check out all the other wonderful recipes and feast on it with your eyes!


Besan ki Phulki is a typical refreshing and flavorful snack of Uttar Pradesh. It's gluten free and makes an amazing snack option for weekend brunch parties. The dish can also be teemed up with mutter ki chaat. Though the original recipe asks for a deep fry technique, but to make it more healthier I opted for Appe Pan. Yes ! with just a few drops of oil, the phuklis get ready in no time and is a blessing to all the weight watchers like me. 


Preparation Time : 5 mins 

Cooking Time : 15 mins 
Total Time : 20 mins 
Course : snack
Cuisine : North Indian 
Yields : 4 servings 

Equipment Required : Appe Pan / Panniyaram Pan

Ingredients :

  • Phulki
  • 1 1/4 cup chickpea powder/ besan
  • 2-3 cloves garlic, minced
  • 1/2 tsp Salt
  • 1/2 tsp freshly ground black pepper
  • 1/2 to 2/3 cup water
  • Pinch Of Baking Soda
  • Spiced Yogurt
  • 600 gms yogurt, whisked
  • 1 tsp black rock salt
  • 3 cloves minced garlic
  • 1 finely chopped green/red chili
  • Few drops of oil for pan frying


Steps : 


1. Place all dry ingredients for phulki in a large bowl and stir to mix. Start adding water gradually and whisk to make a smooth batter. Make the batter till pancake like consistency.
2. Whisk yogurt with black rock salt, garlic and green chili until smooth. Taste and adjust seasoning. 

3. Heat few drops of oil in each section of Appe pan and drop 1/2 teaspoonfuls of batter gently into each  without overcrowding, close the lid and fry over medium heat for 2-3 mins or until light golden brown. Flip and repeat.
4. Remove the first batch and place them in the serving bowl and top with little yogurt. 
5. Again pan fry the second batch and place them over the topped yogurt. Repeat the same till all the yogurt is consumed.
6. Garnish with freshly chopped coriander, chopped green chilies and also some sev if you prefer. You can also use pomegranate pearls to garnish. 
7. Chill for about an hour and serve as a snack in your brunch parties. 

Enjoy!


I am bringing this delicious dish of Shaheen's to all my friends at Throwback Thursday#40, Fiesta Friday#121  and Saucy Saturdays#47


Please do share your thoughts. Your opinion matters!


Thursday, May 19, 2016

Guest Post Series: LOBIA SUVA BHAJI SUBZI (Sauteed Dill with Black-eyed peas) by Shobana Rao


 Hope you all found Ashwini Kamath's Piyava tambali very useful last week. This week my guest is another senior blogger whom I hold in high esteem. She is respected by all and much liked in the blogging community. She is very humble, helpful and resourceful. It is my pleasure to introduce to you Shobana Rao. She blogs @ Cooking with Shobana.Her blog has a plethora of recipes that are traditional Konkani as well as several fusion recipes. She resides in Bangalore, India.

 I am honored to have her write a guest post for me. Today, she has brought us Lobia Suva Subzi which is essentially a dish in which black-eyed peas have been cooked with Dill leaves and spices in a very flavorful manner. Do check her blog "Cooking with Shobana" for more healthy and delicious recipes.


This healthy dish of legume and greens is made as a Guest Post for my friend, Suchitra Kamath who has an interesting blog full of healthy recipes called,"Su's Healthy Living.

The main ingredients in this dish are Black Eyed Beans and Dill Leaves (called Lobia and Suva Bhaji in Hindi respectively). Dill leaves are called Shepu in Marathi/Konkani and Sabsigge Soppu in Kannada. You might be interested to know that Black Eyed Beans (also known as Black Eyed Peas) have many health benefits while Dill Leaves have a distinctive and special flavour all of their own.

You can enjoy this dish with rotis or as a side dish with the main meal.

Servings:

Ingredients:
  • Lobia ( Black Eyed Beans), 1 cup
  • Suva Bhaji ( Fresh Dill Leaves), chopped, 2 cups
  • Rai ( Mustard Seeds), 1/2 tsp
  • Jeera (Cumin Seeds), 1/2 tsp
  • Curry Leaves, a sprig
  • Green Chillies, slit, 3-4, or as per taste
  • Garlic Pods, finely chopped, 3
  • Large sized Onion, chopped, 1
  • Salt, to taste
  • Lemon juice, 2-3 tsp
  • Oil, 1 tbsp
Method:

Wash and soak the lobia overnight or for 8-10 hours

Next morning, pour out the excess water

In a pressure cooker, cook the soaked lobia in adequate water for 1-2 whistles or till done.Take care to see that the lobia does not get overcooked.Once the cooker has cooled remove the cooked lobia and keep it aside.

Heat oil in a thick-bottomed kadhai and when it gets hot add the mustard seeds.When they splutter, add the cumin seeds and when they sizzle add the curry leaves and saute for a few seconds.

Next add the slit green chillies, chopped garlic, and onion and saute till the onion becomes translucent and the garlic gives off a nice aroma.

Add the chopped dill leaves, cooked beans, salt to taste and mix well.

Cover and cook on medium flame till the dill leaves get done.

Finally add the lemon juice and mix well.

Transfer to a serving bowl.


Serve hot with rotis or rice.

Enjoy!!


I am bringing this delicious dish of Shobhana akka's to all my friends at Throwback Thursday#39, Fiesta Friday#120  and Saucy Saturdays#45! Angie's co-hosts this week are Loretta @ Safari of the Mind and Linda @ Fabulous Fare Sisters


Please do share your thoughts. Your opinion matters!

Monday, May 16, 2016

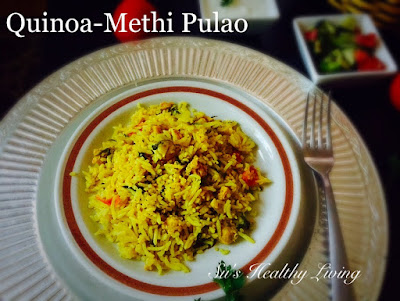
Quinoa-Methi Pulao ( Quinoa-Fenugreek-Rice Pilaf); Meatless Monday


I am big fan of quinoa. I make quinoa-black bean salad, quinoa-avocado salad, quinoa dosa, quinoa idlis, quinoa cutlets. However, unlike many people, I cannot substitute rice with quinoa. I love my rice. You see, I am South-Indian and we South-Indians love our rice! Being  that I am always looking for novel ways to incorporate quinoa into my diet, I experimented making a pilaf using it. I mixed it with rice in the ratio of 1:1. I loved it! Even my picky kids ate without any fuss ( or even realizing), which to me was very encouraging. Since then, I became even more adventurous and made quinoa-methi pulao. This one came  out perfect and my husband almost didn't realize that anything was different.


I think this is a technique that all those who want to incorporate quinoa in their meals should use until they are habituated to quinoa.


Methi pulao is one of my favorite dishes. It is simple and easy to make one-pot meal.


Servings: 3-4


Ingredients :


Basmati rice: 1 cup
Quinoa: 1/2 cup
Fresh Methi leaves (Fenugreek leaves): 1 cup ( from 1 medium bunch), washed and cleaned.
Soya chunks: 1 cup ( optional)
Ghee: 1 tbsp
Coconut oil: 1  tbsp
Clove: 2-3 nos
Cinnamon: 1 inch stick
Bay leaf: 1 medium-sized
Cardamom pods: 2-3
Cashewnut halves: 1 tbsp
Onion: 1 medium, chopped lengthwise.
Ginger-garlic paste: 1 tbsp
Green chillies: 3-4( depending on your spice level),chopped fine
Turmeric powder: 1 tsp
Garam masala powder: 1 tsp
Tomato: 1 medium, chopped
Salt : to taste
Sugar: 1/2 tsp
Hot Water: 3 cups + 1 cup


Method:


Rinse the basmati rice thoroughly until all the starch is removed. Soak basmati rice in water for 30 mins. Drain the water and let it dry for 20-30 minutes.

Soak the soy chunks in 1 cup water with a pinch of salt for 5-10 mins. Squeeze and remove them from water. Keep aside.

Wash the quinoa and keep ready.
Boil the water and keep ready.

Heat oil/ ghee mixture in a kadai/ sauté pan/ pressure cooker. Add the cloves, cinnamon, cardamom, bay leaves and the onions. Sauté until the onions turn transparent.

Add ginger-garlic paste, chopped green chillies and sauté for few seconds.

Now add the turmeric powder and the chopped tomatoes. Saute until the tomatoes wilt.

Add the methi leaves and cook for 3-4 minutes. 

Add the garam masala powder and drained soy chunks. 

Add the drained rice and sauté for 2-4 minutes. 

Add in the hot water, salt, sugar and bring it to a boil. 

Add quinoa. 

Cover, reduce the flame to low and cook for 15 minutes. If you are using a pressure cooker/ pan, do not use the whistle/ weight.

When done, fluff with a fork/ spoon.

Garnish with freshly chopped cilantro leaves.


Serve hot with a Raita of your choice or by itself.

Enjoy!

I am bringing this delicious dish to all my friends at Throwback Thursday#39, Fiesta Friday#120  and Saucy Saturdays#45! Angie's co-hosts this week are Loretta @ Safari of the Mind and Linda @ Fabulous Fare Sisters


Cooking made easy:


The quinoa can be cooked separately and added to the pulao at the end once the rice has cooked.

Quinoa can be made ahead of time and stored in the refrigerator for 3-4 days.

You can use only garam masala powder or only whole garam masala depending on your preference and availability.

Tip for healthy living:


Fenugreek leaves are highly nutrient-dense . They are especially beneficial for diabetics. Quinoa as we are all aware is a super-food! It is gluten-free and protien-rich. You can read more regarding the benefits of quinoa in the references below:

References:
http://healthnfitnesshops.com/7-health-benefits-of-quinoa.html/
http://www.mindbodygreen.com/0-4994/7-Benefits-of-Quinoa-The-Supergrain-of-the-Future.html
http://www.bbcgoodfood.com/howto/guide/health-benefits-quinoa

Food for thought:


People are trapped in history and history is trapped in them. James Baldwin


Please do share your thoughts. Your opinion matters!


Let us stay connected on Facebook Pinterest | Twitter | Instagram | Google+ 


Friday, May 13, 2016

Guest post series: Piyava Tambali ( a spicy, tangy coconut based sauce with onions in it) by Ashwini Kamath


Last week we all enjoyed seasoned blogger Radha Natarajan's amazing one-pot quick sambar! This week we have another very simple and humble recipe that is absolutely delicious! Piyava Tambali ( a spicy, tangy coconut based sauce with onions in it). This is a traditional Konkani side-dish that has been brought to us by a young, dynamic, enthusiastic and relatively new blogger, Ashwini Kamath.


Ashwini is a mother of two children and a home-maker. She loves cooking dishes that are simple, easy, quick and healthy! Now you see why I invited her over! She started her blog "Cook with Ashu" one year back so that the easy and quick recipes from her kitchen reaches people who want to savor authentic and traditional Konkani food.

Do visit Ashwini's blog & Facebook page "Cook with Ashu" in which she has shared not only lots of easy and quick recipes for veg and non veg dishes but also tips and information about food.


I am very much thankful to Suchitra for believing in me,and giving me an opportunity to write a guest post in her blog ...'Su's Healthy living'...

Suchitra wanted a healthy ,easy and quick recipe...so here I am with a popular and traditional recipe of every konkani  home known as 'Piyava Tambali '......This Tambali is usually prepared during rainy season or when there are no veggies left in the fridge and there is nothing left in the kitchen pantry as this recipe is prepared using only 4 ingredients: coconut,raw onions,red chilles and Tamrind.....
      
It is one of the easiest and quickest  side dishes which can be prepared for rice instead of sambar or Rasam....

This is a perfect combo to boiled rice or steam rice with papads or fryyums (vodi /sandige) ...    But the shelf life of this recipe is less as the dish is not cooked so refrigerate this once it is done....I can say that this is one of the best recipes for cooking without fire ..


SERVINGS: 2-3

INGREDIENTS

•1 cup fresh coconut grated
•6 fried red byadagi chillies
•a small piece tamrind
•Salt to taste
•1tbsp coconut oil to drizzle (optional )
•1chopped raw onion

METHOD

▪In a mixi jar add  coconut ,red chillies and tamrind and grind to smooth chutney consistency using little water
▪Add salt and just whisk once to combine
▪Remove this to a container add water as required (don't add much water,let the ground masala be slightly thick paste )
▪Add raw onions and give a good mix
▪Drizzle coconut oil on it while serving

NOTE
* mix onions at the time of serving
*adding oil is a traditional method but this can be omitted .


I am bringing this simple, yet delicious dish of Ashwini's to all my friends at Throwback Thursday#38Fiesta Friday#119  and Saucy Saturdays#45! Angie's co-hosts this week are Ahila @ A Taste of Sri Lankan Cuisine and Diann @ Of Goats and Greens.


Please do share your thoughts. Your opinion matters!